Angulated Screw Channel Custom Abutments for GM coming soon!!!...
5 Concepts of Restoring GM Implants for Singles
5 Concepts: Morse Taper/ Platform Switch
5 Concepts: Morse Taper/ Platform Switch
5 Concepts: Morse Taper/ Platform Switch

Follow these next 5 concepts and images for the correct restoration of GM Neodent single implants with a morse taper connection and platform switch. Communication to the lab is so important.
Impressions: more info needed
5 Concepts: Morse Taper/ Platform Switch
5 Concepts: Morse Taper/ Platform Switch
Traditional Impressions will tell the lab where the top of the tissue is and where the implant is positioned below by attaching to coping. IT WILL NOT tell the lab where the implant is in relation to bone with out an x-ray sent to lab with prescription.
Why Xray with Rx to Labs?
5 Concepts: Morse Taper/ Platform Switch
Send an X-ray to the LAB so they know where the implant is in relation to bone. This x-ray above shows the tussie measurement gauge finger tightened down on implant.
Tissue Measurement Gauge
Tissue Measurement Gauge: In both surgical and restorative kits. The black lines indicate different tissue hieghts that match our healing abutment heights and the margins on our abutments.
Xray of Tissue Measurement Gauge
Xray of Tissue Measurement Gauge
the yellow lines on the xray indicate that both a 1.5 and 2.5 gignival margin on abutment would work for margin height selection of abutment.
Matching vs Non-matching
Xray of Tissue Measurement Gauge
Matching concept puts a flat on flat connection of abutment part up against the platform of the implant (like a Butt Joint) bad for bone maintenance. Non-matching: starts a more narrow connection on the implant with an arrow abutment that emerges out gradually. GM has a 3.0 platform
Crestal vs Subcrestal
Was the implant placed Crestal or Subcrestal? The lab needs to know to create narrow emergence profile initially. Share an x-ray so lab can choose correct margin and design.
Concave vs Convex
Critical that the Labs design your restoration CONCAVE at platform to emerge through bone and tissue, then change to convex shape later for tooth design and contacts.
Healing Abutment Emergence
Make sure you tell the lab the size of your healing abutment: Their final abutment will match the same emergence profile of your healing abutment. YES, your abutments will look smaller in diameter and emerge out. "Tomato on a popsicle stick"
Proper Margin Height Selected
Proper Margin Height Selected
Most important: the margin of the abutment should be 1.5mm-2.0mm above the bone AND 1-2mm below the gingival margin on buccal
Neodent GM restorations
Emergence Profile and Selection of Correct Margin Height on Abutment
Follow the same emergence profile of all the healing abutments and stock components
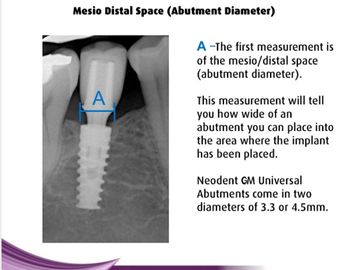
A. mesio/distal space for the abutment diamter
diameters: 3.3, 4.5, 5.5, 6.5
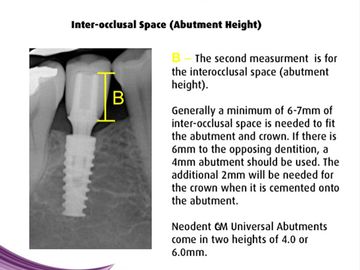
B. interocclusal space (abutment height) 6-7mm needed
abut heights: 4 and 6mm (unless custom)

C. gingival height of abutment. Margin 1-2mm subgingival
gingival heights: 0.8, 1.5, 2.5, 3.5, 4.5, 5.5
Emergence from Healing abutment (4.5 diameter x 4.5 height)
diameters: 3.3, 4.5, 5.5, 7.0

Perfect height Healing abutment selected!
Emergence from Healing abutment
PEEK Healing Abutment.
5.5 diameter x 3.5 height
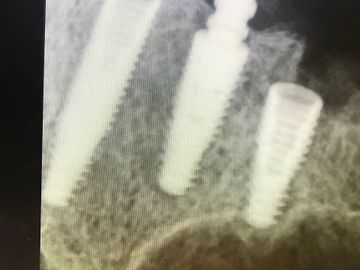
Tissue Measurement Gauge
even on xray can see notches on side of tissue gauge

Tissue Measurement Gauge
read tool at top of tissue, then select margin of abutment 1-2 mm subgingival
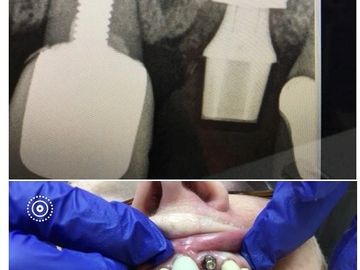
Emergence from Stock Abutments
Anterior case:
upper lateral with "hybrid abut" titanium base, zirc pillar, then cemented zirc crown.
Emergence from abutment
Add a description about this item
Emergence from Stock Abutments
Illustration of Ideal Restoration
custom abut replaced immed load temp lower anterior
Stock Abutment, proper margin selected
Universal Abutment 4.5 diameter x 2.5mm ging margin
Don't Do this!!!!!- Bad Restorations
The implant and Healing abutment have bone growth up and around the Healing abutment on a 3.0 platform. reviewing abutment with tissue model removed on model there's abutment material all the way out to edge of implant. IT WILL NEVER SEAT!
Doesn't follow Healing Abutment emergence!!!!!!
This will never seat in the mouth, blanch tissue or get hung up on bone and not seat.
Blanching tissue, tight contacts, wrong emergence profile
22
instead choose 1.5 or 2.5 margin on abutment, build out emergence from platform better.
Blanching tissue, wrong emergence profile
22
instead choose 1.5 or 2.5 margin on abutment, build out emergence from platform better.


